 When I built my first DIY audio recording studio, it was out of necessity and a lack of budget. I had landed several new clients all wanting voice work yesterday, and my previous setup, as glamorous as it was to have a towel over my head while recording, needed an upgrade. Fast.
I looked around for DIY options that didn’t cost thousands to build in your home, but even the least expensive option was too expensive. I was getting frustrated until one day, I had an idea. Foam board. What if the studio were made from foam board covered with acoustic tiles? And that’s exactly what I did – for less than $200 USD.
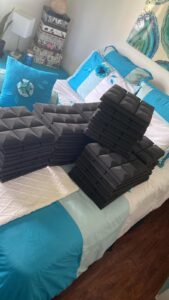
First thing I did was order 12 x 12 acoustic tiles from Amazon. They arrived shrink wrapped and oddly shaped. I spent most of the day soaking each tile in warm soapy water, rinsing it, wringing it out and placing it on drying racks in the bathtubs.
Then, I went on a hunt for foam board and other accessories which I found at an office supply store. I grabbed two tri-fold presentation boards and two flat pieces the size of my window. I also grabbed glue sticks and Velcro adhesive strips. I brought it all home and got to work creating my recording studio.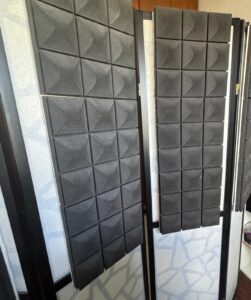
I used a utility knife to cut the foam board into the sizes I needed. The acoustic tiles had undergone a “glow up” and I used the glue gun to attach them to the foam board pieces. The first pieces installed were the two for the window. I lived close to a busy street and the boards worked wonderfully to block out the noise, but I wanted to be doubly sure you couldn’t hear anything while I was recording. I took one of the tri-fold pieces and cut a notch into it the same height as my laptop power cord. I wrapped the tiled trifold board around my laptop and microphone stand. It cut out all the noise from the street.
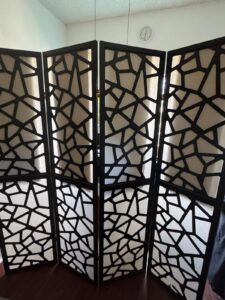
I had created everything I needed to soundproof what was in front of me, but what about what was behind me? There was no carpeting in my office. What could I do to prevent any echo or hollow sound in my voice? A room divider. I needed an inexpensive room divider that I could also cover in acoustic tile-covered foam board panels. Which is what the second tri-fold board was for. I cut it into four equal rectangles, covered them in acoustic tile and attached them to the back of the room divider with Velcro adhesive tape. Then I pulled the soundproofed room divider around the desk and chair – and I ended up with a completely soundproofed recording studio in my office. For about $175 USD.
I made back my investment and time with the very next voiceover job. I used that studio for three years before I upgraded to what will be a story for another day!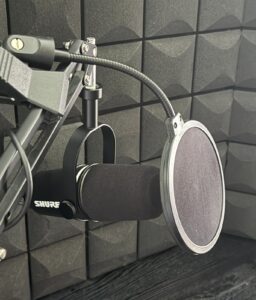
Okay, my creative one, I hope you enjoyed learning how to make a soundproofed recording studio on a budget. Now get in there and start doing some voice work! It will sound great! The next “Speak” blog will be coming in a few weeks. If there is anything you would like learn about, send me a message.